Monday, 25 May 2009

Exposure, part IV - Examples

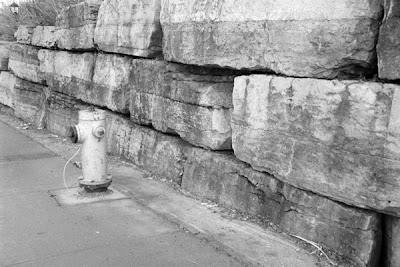
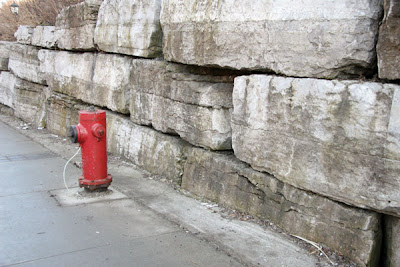
We are fortunate to live in an age of colour photography, where we need not rely solely on tones to convey our message. The introduction of colour has changed the subjects that could be photographed. A bland scene lacking in tones can be greatly enhanced by addition of colour.


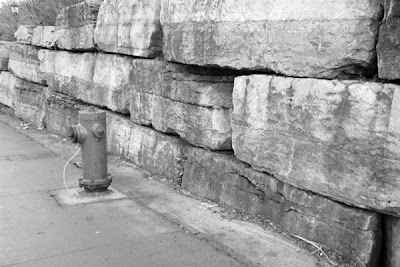
Of course, there are ways to increase the range of tones in a flat scene like this, such as the use of a red filter, as simulated digitally below.


Being to add punch with colour doesn't mean that tones are no longer important, as illustrated in the picture below.

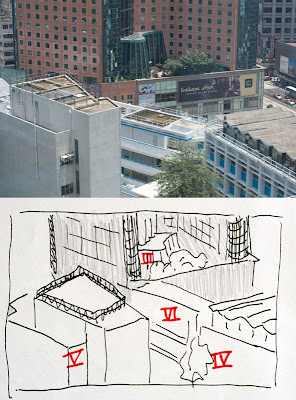
This picture was taken because, #1 it was a convenient look out of my window and #2 it was a sunny day so the scene had lots of dynamic range from the dark interior of the hotel lobby to the bright reflections on the white building. I spot metered the scene and labelled some of the larger areas. The reflections on the roof reached much higher values than zone VI and were hence impossible to preserve if the rest of the scene was to remain visible. It was decided that the areas against the sun, the brown wall of the hotel and the building on the left (which made up the majority of the picture) were to be placed in zone V, the rest of the scene fell into their respective zones as noted in the sketch. The shadowed areas were placed in zone V to ensure that the areas under direct sunlight would be in zones Vi and above to convey the snese of harsh sunlight on a cloudless summer noon.

Matrix metering suggested that I expose for an extra stop which, for me, would have blown out the lower half of the picture and destroyed the feeling of harsh directional light.

Thursday, 7 May 2009

Photography as an illusion.

The digital sensor and the processing software that ultimately turns millions of voltage values of the sensor into an image on the computer screen is mostly linear.

Our eyes however are not. Not only are we sensitive onto fractional changes of brightness rather than absolute values of brightness, or concept of brightness itself is highly subjective as this optical illusion will show.


The two central gray squares are, as you would know, the same shade of gray. Consider a real world example.


What is wrong with this photo? Do you see the white and black areas? I assure you neither are white or black. I manipulated it so that it only has gray tones and never reaching the full brightness [or full blackness] of my computer monitor.

The same thing happens in photos, both b&w and colour.


Doesn't the sun glow in this one? In reality, the sun in the picture is of course no brighter than the white background of this blog. If the brightness of your computer monitor is many times less than the afternoon sun, otherwise all this white background of this blog would have blinded you long before you reached this point. The same is true for the shadows. If you have ever looked at an LCD monitor at night with the lights out, you would see that the monitor glows even when you display a black square. Clearly, the blackest of blacks displayable is much brighter than what is found in the real world.

But when tones of gray come together, our brain is able to process them and generate the illusion of light. It is with this amazing shortcoming of our brains to refuse to accept any information at face value that we are able to perceive light in an image that has less than a hundredth of the dynamic range of a typical sunlit scene. The aim of a photograph is not to capture reality, through the choice of exposure, selective focus, composition and the many other tools available to the photographer, the photographer is making both necessary [due to the above mentioned constraints of the medium] and artistic interpretations of reality. A photograph is merely a two dimensional arrangement of tones that creates illusions of light, space, and for the accomplished photographer, movement and even emotion.

Why matrix metering is the worst kind of metering ever.

For me, matrix metering is a black box. Matrix metering meters the whole frame in different sections and compares it to a pre-determined set of scenes. The computer in the camera then makes it's best guess as to what is actually being photographed and adjusts the exposure accordingly.

For example, the scene has a big bright spot in the middle and everything else is dark. For the sake of discussion, let's assume that the background and the bright thing differ by 4 zones. The camera might guess that you are doing a portrait on a black background, it also assumes that a face is supposed to be in zone VI, so it returns an exposure that would put the bright area in zone VI instead of the normal zone V and gives you the exposure. All is good. The face is not gray, as it would be if you used the other "dumb" metering modes and the background is black at a nice zone II, hiding any creases and patterns that you might have in the black background cloth.

But what if I am actually photographing a lamp with a lamp shade against a wall and I would love to see the intricate pattern on the wall paper? The camera would still put the lampshade in zone VI and letting the wall fall into zone II. I would get a black wall with only minute details of the wallpaper design. Not what I wanted. It would be better to sacrifice some detail in the lampshade and get the details of the wall instead. So I would place the wall in zone IV and the lamp would fall into zone VIII. That gives me the shadow detail of the wall at the expense of loosing detail in the lamp shade.

The biggest problem of matrix metering is that you never know what zone it placed the subject in and most of the time you don't even know what part of the scene the camera thought was the subject.

I'll put this example here to get ahead of myself and bring everything together, i.e. how the inherent limitations of digital manipulation would affect exposure decisions. Consider the case where I wanted detail both in the lampshade the wall, I would instead place the wall in zone III letting the lamp shade fall into zone VII knowing that I have a better chance of getting usable detail by adding digital light to the zone III part than pulling the highlights of the zone VIII part which usually gives grays instead of the real colours of the lampshade.

Exposure, Part III - Light meters and placing the world into zones

All camera metering systems are reflective metering systems as opposed to incident metering systems, which because of their limited use, I will not talk about here in detail. I always meter with the spot meter in my camera which figures out the exposure from the amount of light in the central 5% of the frame. If your camera doesn't have such a function, you can fake it by zooming in on various parts of the image before metering. This turns your fancy matrix metering or center weighted metering into what is effectively a spot meter.

Before you do anything. Change the metering mode to spot, at least center-weighted if possible. What follows will not work with "intelligent" metering modes such as matrix metering. More on why matrix metering makes poor photos later.

First, how does the light meter determine the exposure? The meter determines the exposure necessary to render the area that is metered into a middle gray [zone V] in the final image. For digital cameras outputting JPEGs directly, one could argue that the meter knows exactly what amount of light will give a middle gray in the image because the same camera firmware that determines the exposure processes the data from the sensor into the image. If you calibrate your monitor right, it would show up as middle grey too.

Whenever you meter off some part of the scene and expose the photo according to the exposure values given by the metering system for that part of the scene, we say that you place that part of the scene in zone V. Since each photo has only one exposure , the other parts of the scene that are brighter or darker automatically fall into the other zones [yes, I do HDR too and I add digital lighting but we are talking about JPEGs straight out of the camera for now]. Without post-processing, there is nothing you can do about it, if part A and part B of the scene differ by 3 zones, they will always differ by three zones no matter what zone you place part A in.

All is nice and good if you put a card with a value of middle gray in every shot, meter from that and then remove the card to shoot the picture. This essentially turns the reflective metering system to a incident metering system because you are controlling the reflectivity of the surface on which you meter. But this is not what we usually do and most of the time, it is simply not possible. Imagine draping a large square of middle gray cloth on a distant mountain and metering off that then packing it up just before the exposure.

All still is nice and good if you photograph scenes that have elements that are middle gray or average to a middle gray [the classic example being a Dalmatian], sadly, that's often not possible either. Consider my nine shots of a white wall in part IIb. The meter reading places it in zone V so it turns out to be a perfect shade of middle gray, smack in the middle of pure white and pure black [joys of the linearity of digital images]. The meter is doing a wonderful job, but it has one critical flaw, it has no way of knowing that I want my white wall to be white. If I want the wall to be white, it had better be in zone VIII [or more], so you will have to increase the exposure by 3 stops based on the meter reading. In M mode, you would dial in your required exposure and in shutter/aperture priority modes you would set the +/-EV to +3EV to get the same results. In that way, you have just placed the wall in zone VIII.

Photos rarely have only 1 zone. Those that do are probably not very interesting either. When it comes to the real world, scenes will most often have more than 9 zones of dynamic range. Even with the much greater dynamic range of our eyes, we still cannot encompass the full range of light we encounter. The most common example is that a flash light in a dark room makes you loose you night vision, everything around the flashlight goes black, you are out of dynamic range. Our brains are hard wired to do everything to attenuate the brightest spot in the scene to our comfort level, be it grabbing sunglasses [use an ND filter when f/22 is still too bright], squinting, pupil contraction [decrease the aperture] or simply a matter of shifting perception [think of your eyes changing ISO]. Better safe than sorry. Working with the much smaller dynamic range of the camera, the photographer will need to decide what goes black and what goes white, to sacrifice some detail so as to preserve the moment. That, is the art of the exposure.
Wednesday, 6 May 2009

Exposure, Part IIb - Know your zones

Before we find out how many zones your [or rather my] camera is capable of delivering, let's go off at a tangent and look at what controls the tonal values of a photo and the concept of "stops".

For the digital photographer, there are 3 ways to change the tonal values of an image, namely shutter speed, aperture size and ISO. With that comes the concept of stops. A change in one stop is any method that will increase or decrease the amount of light getting to the sensor by a factor of two. If you change the shutter speed from 1/100 to 1/50, then the shutter is open twice as long and you have increased your exposure by one stop. Similarly if you change your aperture value from f/5.6 to f/4, you have doubled the area of the aperture [note that the aperture values form a geometric progression of sqrt 2 because they are an indication of the diameter of the aperture which is related to the area of the aperture by an exponent of 2] and hence twice as much light will pass through your lens and so you have increased your exposure by a stop. Technically, doubling the ISO value does not result in more light coming through the camera nor does it make an area twice as bright, but the ISO curves of digital camera are linear enough over the dynamic range that for our intents and purposes, I will stretch the definition a bit and claim that if you increase the ISO value by a factor of 2 the image will be twice as bright.

Now back to zones. The difference between two consecutive zones is one stop. This is how I got from pure black to pure white with my camera. The subject was a white wall with some texture. Start from zone V which is whatever the automatic metering system says is the "correct exposure", which was 1/40, f/5.6 at ISO 100 for this shot. Get the zone Iv image by exposing at one stop lower, i.e. 1/80, f/5.6 at ISO 100. The other images were generated similarly.

The single most important thing that you need to know from this article is that it does not matter what the zone V exposure is. I can generate the same set of images if I used the overcast sky as my "white wall". In that case zone V might be 1/160, f/22 at ISO 100. The I would simply get the zone IV image by changing the shutter speed to 1/320s. In an ideal world, the grey in the zone V shot of the wall would be the same grey as the zone V shot of the sky. If you already see where I am getting at, then perhaps the rest of the articles on the zone system will seem trivial. If you are still puzzled, maybe I am a bad writer or maybe you have to read on.


Theoretically, you can vary the ISO and keep the shutter speed and the aperture constant, or vary the aperture and keep the other 2 parameters constant to get this set of shots but varying the shutter speed gives you much more range because while there are a total of 6 stops of ISO and aperture [ISO100 - 3200 and f/4.0 to f/22], the shutter speed goes from 30s to 1/8000s covering almost 19 stops. Note that I could not get zones 0 and X. I and IX were pure white and pure black devoid of detail to my eyes when I look at them on my screen. Don't use the color selection tool in Photoshop to test whether your whites are actually white because what we are concerned is how the images look on your screen. It doesn't matter if the white image actually has detail, if you can't see it on your screen, it's pure white; unless of course, you look at your images by rolling a colour selection tool over it instead of looking at it.

So I find out my Canon 30D together with my crummy monitor can generate images of a dynamic range of 9 zones. Not too bad when compared to a b&w print after all [of course we are not talking about the contrast between zone I and zone IX which is much higher on a gloss print than on an LCD monitor].

Now that we know what zones are and how many zones my [and your, if you do the test] system gives me [you], we can move on to talking about how we actually use the zones.

Exposre, Part IIa - What are zones?

Richard Feynman once said,
"The witch doctor says he knows how to cure. There are spirits inside which are trying to get out. ... Put a snakeskin on and take quinine from the bark of a tree. The quinine works. He doesn't know he's got the wrong theory of what happens. If I'm in the tribe and I'm sick, I go to the witch doctor. He knows more about it than anyone else. But I keep trying to tell him he doesn't know what he's doing and that someday when people investigate the thing freely and get free of all his complicated ideas they'll learn much better ways of doing it."
Rules such as Sunny 16 or the instinct of an experienced photographer will get them good prints, there is no doubt about that. Instinctive rules for exposure have been used since the earliest days of photography and are still used now, but the zone system of Ansel Adams allows us to talk about all the processes from exposure to the print in one coherent common language, much like how Feynman used mathematics to allow discussion of the universe we live in.

The zone system is a means to attain an end and should, and must, be modified by each individual according to their own uses and equipment. Just Ansel would calibrate each batch of film before shooting and developing. We are fortunate that digital cameras are pretty much calibrated within each brand. Therefore I would not have to drastically change my habits when I update my camera, given that I don't switch ships.

I do not print my digital images, at least not by myself. To those who do, I congratulate you on your hard earned expertise in calibrating your printers. For me, "the print" is the image I see on my crummy laptop computer monitor and that is the end product of my photography. Of course, each of you will have a different monitor with different brightness, contrast and gamma, not to mention the nonlinearity of pixels of different colours. What is pure white on my crummy monitor may reveal some detail on your ultra high dynamic range monitors and so you will see the zones differently. What matters is that as long as I keep my monitor at its current settings, the system will work for me.

So what are zones? A zone is the vocabulary used to define a shade of black. Adams concerned himself always with the final product, the print, but the concept of zones is sometimes used to describe the density of the negative as well. Since digital photography does not produce a negative, we need not worry about that.

Adams defined 11 zones for b&w prints from zone 0 to zone X covering pure white to densest black [which correspond to exposing a digital sensor indefinitely or not exposing it to any light at all]. The dynamic range or what Adams considered the "useful" range was from Zone I through Zone IX. The textural range comprising Zone II through Zone VIII was the range in which details could be discerned.

Borrowing from wikipedia, the graph below shows how Adams defined his zones.

Zone Description
0 Pure black
I Near black, with slight tonality but no texture
II Textured black; the darkest part of the image in which slight detail is recorded
III Average dark materials and low values showing adequate texture
IV Average dark foliage, dark stone, or landscape shadows
V Middle gray: clear north sky; dark skin, average weathered wood
VI Average Caucasian skin; light stone; shadows on snow in sunlit landscapes
VII Very light skin; shadows in snow with acute side lighting
VIII Lightest tone with texture: textured snow
IX Slight tone without texture; glaring snow
X Pure white: light sources and specular reflections

As with negatives, additional zones can be teased out from a digital image by special processing techniques [HDR being the most dramatic demonstration of them], but to keep it simple we shall start by looking at normally processed images. Fortunately, normal processing for digital images much more trivial than normal processing of film. For this discussion, we shall consider "normally processed" as what appears on your screen if you shoot in JPEG with the standard picture style.

Essentials of the exposure, Part I - Introduction

For lack of a comprehensive guide to exposing a photograph, except perhaps Ansel Adams famous trilogy, this blog is born. I will try to assemble here, from my own experience and materials gathered from others, a step by step guide to the zone system that will be comprehensible and useful to both the masters and the inexperienced. A bold challenge indeed.

In this age where every camera has AE, one might ask, "why start from exposure not composition?" This is the question I have asked myself too. It is perhaps easier to assemble a guide to composition rules but in the end, composition is more of an art than exposure is. Although the novice will undoubtedly be bored by lengthy (I assure you that there will be many parts on this) and somewhat technical discussions on exposure, I feel that in the end, exposure will be easier to master than composition.

One of the most vigourous treatments of exposure was provided by the master photographer, Ansel Adams, in the form of the zone system. The zone system was a system which enabled the photographer to determine all the necessary steps in order to create his/her desired print. Emphasis was that all the steps from exposure, development and printing were of equal importance to the final product, the print. Too often, digital photographers fail to realise this relying too heavily on post processing to achieve the desired print. Make no mistake, Ansel believed that each print should be processed differently. He would be an advocate of digital manipulation if he were born in our age but the fact is that digital or darkroom manipulation will never fully correct for mistakes made during the exposure.

The subsequent articles will discuss the exposure part of the zone system in the context of digital colour photos. While b&w images illustrate the concept of zones and tones better, most b&w photos straight out of the camera are rather unattractive and require post processing which complicates our discussion of exposure. (Even from this early stage, it becomes evident that exposure and post processing are intertwined.) Given that we do not operate digital cameras in fully manual mode all the time, the discussion of exposure will use terms such as exposure compensation, but keep in mind that +1EV is moving the exposure 1 zone up from what the meter suggests [zone V] and the -EVs are the opposite.

Ansel said in 1981, that
“I believe the electronic image will be the next major advance. Such systems will have their own inherent and inescapable structural characteristics, and the artist and functional practitioner will again strive to comprehend and control them.”
And it is with this in mind that we will explore the "inherent and inescapable structural characteristics" of the digital image in the articles to come.